Saturday 27 January 2018

Tat It and See - Backwards!

I’ve been so excited to participate in Jane’s Tat It and See game. I’ve been away, so I’m a bit behind the times, but it looks like I’m the only one so far messing this up by doing it backwards! I’ll be posting my attempts, failures, and what variations I’ve made. I’ve mostly found that if I ignore the diagram, I can work from written instructions with few dramas as long as I follow what my thread is doing. So far, that is the case with TIAS 18, but Jane’s designs are so fun and creative, this will surely get very interesting.

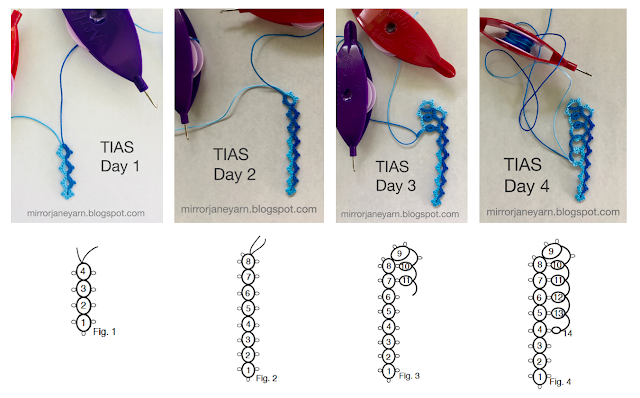
Left-Handed TIAS Days 1-4


Split rings and ring clusters are what I have found causes the most controversy when working the opposite way to which the pattern was written, but with the chains connecting things on Day 3, it's been okay so far. Again, as long as I worked from the instructions and not try to copy the diagram, when things started to get interesting on Day 2 there weren't any problems. But, my goodness, those Day 4 rings are tiny!


I've included the pattern here so my little seahorse can look at his reflection! My tail is a bit curlier, but I try not to argue with what the thread wants to do, especially when I have no idea what I'm trying to do, it works out much easier that way.

I'm working in Lizbeth 20  #149 Peacock Blues, another stunningly gorgeous colour way that makes me so happy!
Saturday 13 January 2018

Mirror Vision

Mirror Vision Necklace


Marilee Rockley is amazing. I’m loving making her Vision necklace, which is available as a PDF from her awesome blog. It’s the perfect pattern for those of us tatting backwards, because it’s already a mirror of itself!

When working left-handed, just follow the pattern as it’s written and you make the right hand side of the necklace first. Then just follow the instructions to mirror it. As there’s only one ring cluster, and the first thing Marilee does is tell us how to deal with it, all you need to do is keep an eye on which side you’re working. Which is also super simple as the first thing you make is a huge ring of picots. It feels a bit big and a bit technical, but it’s so beautifully constructed, it just comes together.

I’ve put to use a few beading tips I’ve seen since I swore off the bloody things a couple of months back, and it makes such a huge difference. Paperclips and floss threaders. My gushing rant became too long and I need to take some photos so I'll leave you with that inspiration and make another dedicated post soon.

I’m already shopping for new yarn and beads to work this necklace up properly. It's so pretty and so much fun to make!

This test piece #2 pictured is worked in Milford Perle 10 in Periwinkle with 6mm large bead, squashed 4mm medium beads and size 12 seed beads.. The last rick-rack chain is missing because I ran out of thread on my shuttle and barely made it through the preceding split rings!

Monday 1 January 2018

Mary Konoir’s Spinning Wheel

I loved the flowing, twirling movement of the spinning wheel the first moment I saw it. I haven’t managed to get my hands on a Mary Konior book yet, but I’m hopeful. All of her designs I see have an elegant, modern flow that just grabs me.
I loved figuring out this pattern, working it was a joy and I am quite delighted that it came out spinning the opposite direction. 


This one is worked in Milford Mercer 20 in the aptly named Ombré Purple. In this size it’s perfect for admiring through the bottom of a wine glass. 

I worked from Sarah’s picot-less version at Lace and Bees. I’m also pretty subtle in the picot department as you can see. I did shorten the chains from the centre for this version, which resulted in the wheel having 8 arms instead of 9. I thought this could be fun to try with alternating coloured arms, as well as experiments with how many arms one could fit in if given enough central space.

I have a feeling that, depending on interesting yarn availability, I will soon own more coasters than is at all practicable.