This long weekend, I found myself clearing out cupboards, purchasing wardrobe space-mapping contraptions and organising the crap out of my yarn stash.
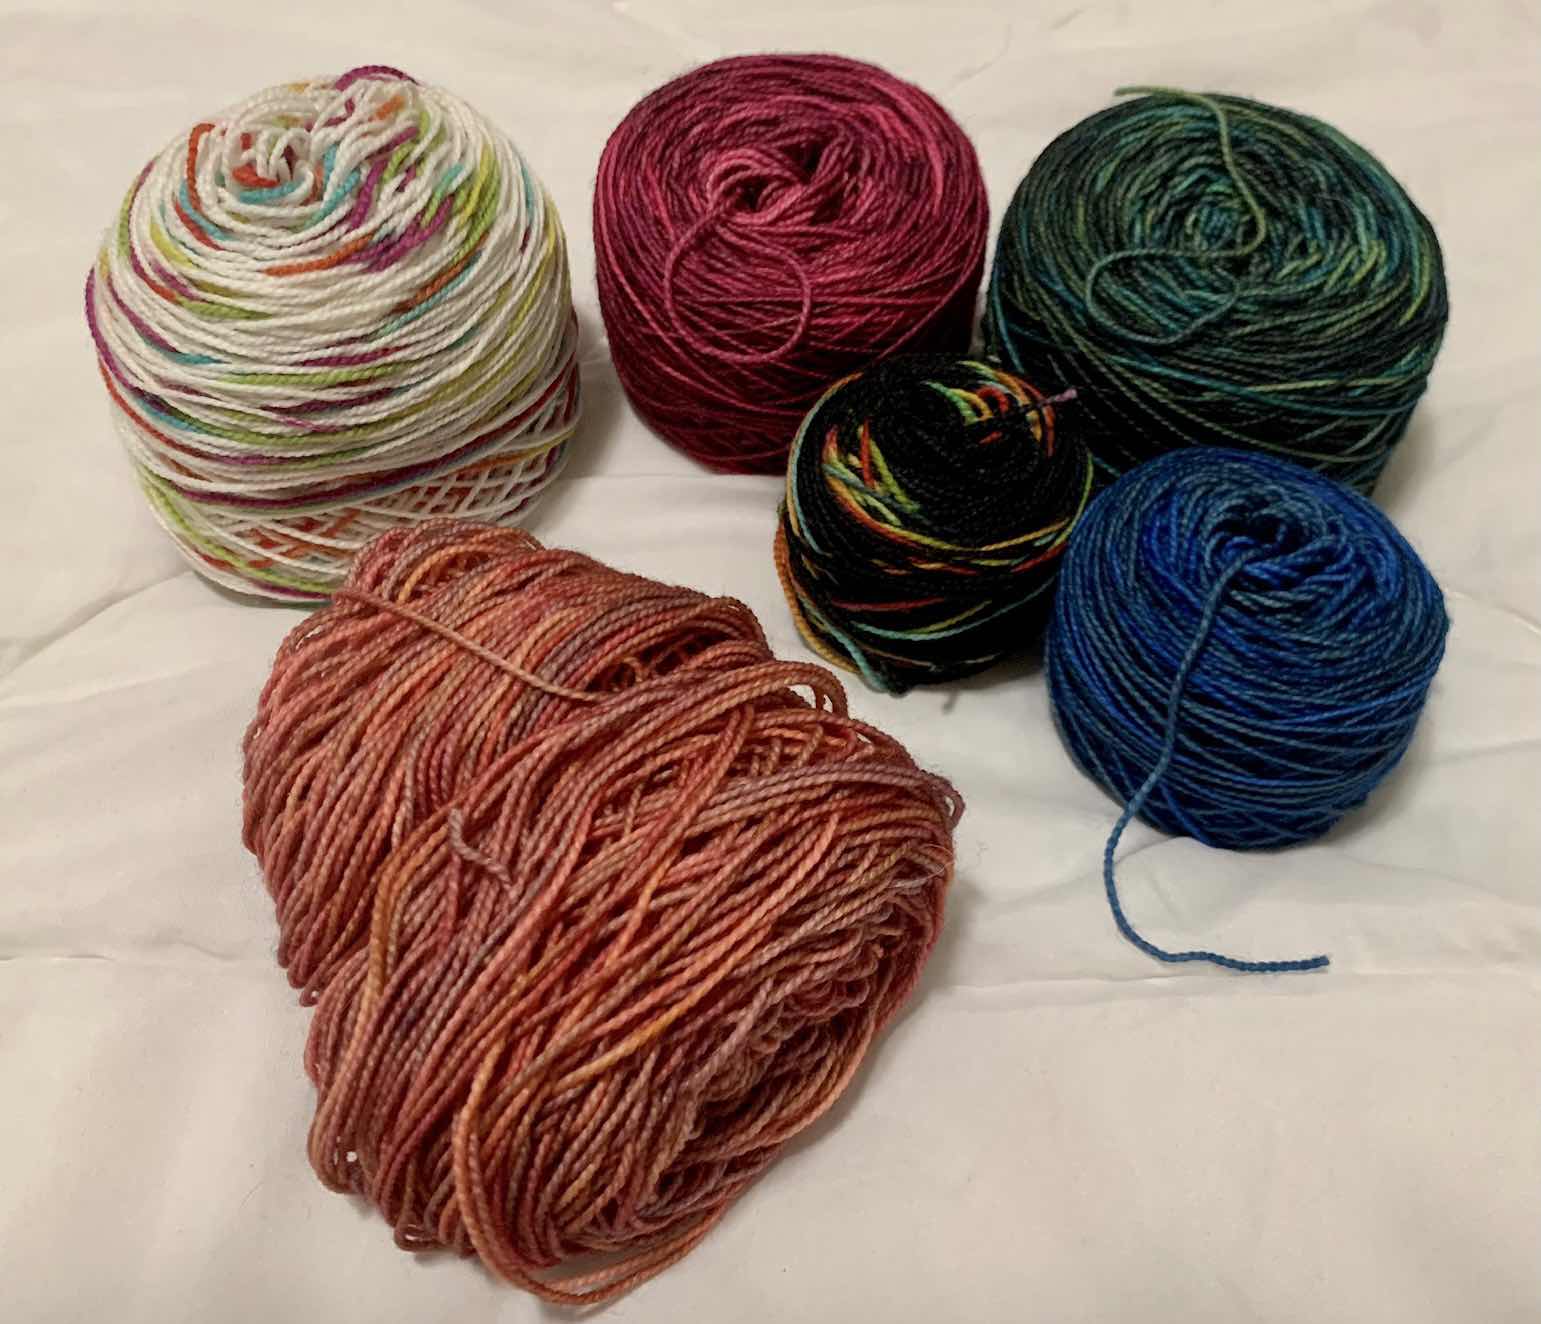
Selection of wound balls, including a tiny back ball with white and apricot balls before winding.
What I found in all of this was a whole bunch of wound balls that had been partially used for projects, but also grabbed randomly for swatching, so I had no idea how much yarn was in each, but they all looked about the same. I figured I'd chuck them back on the ball winder to tidy things up and was pretty surprised how small some of them were. The black ball was the most surprising, and inspired me to take some pics. It looked pretty similar to the apricot ball before I wound it and it came together so teensy tiny!
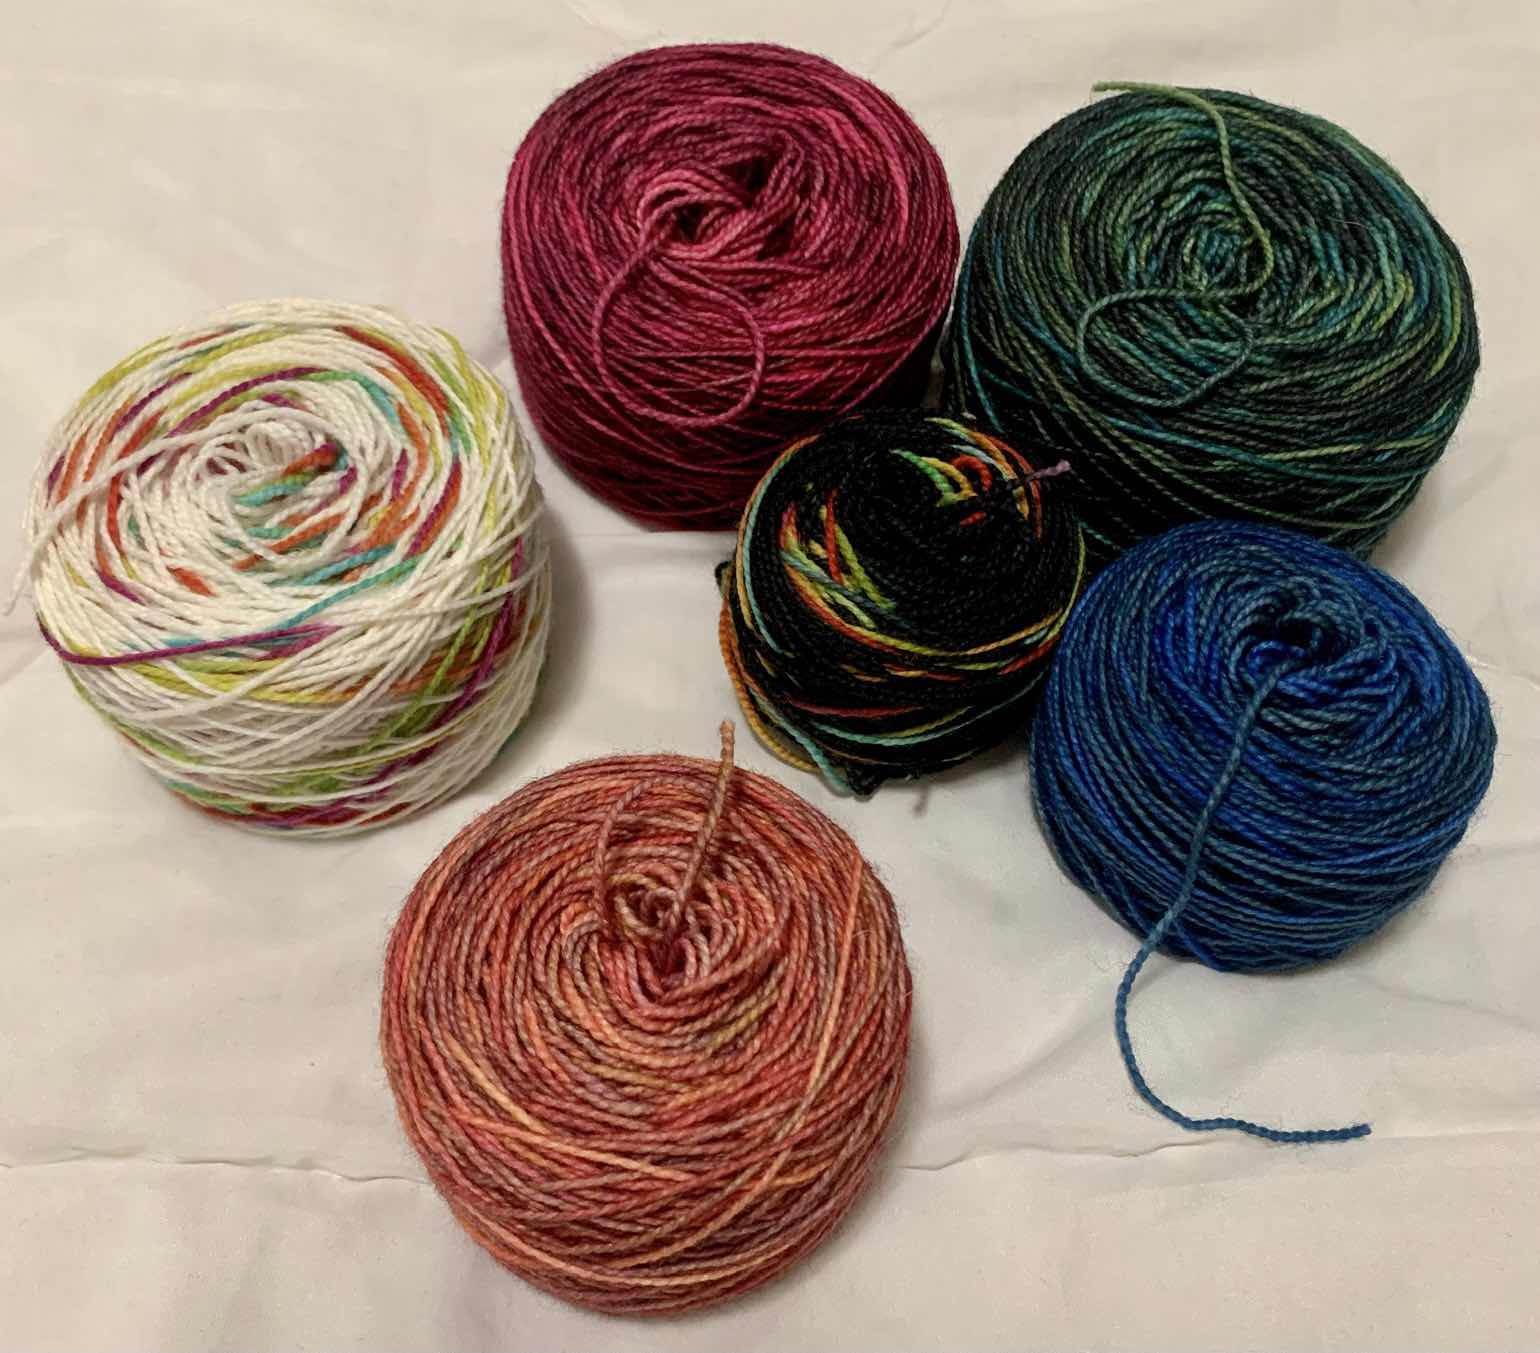
So here's the after pic of the white and apricot yarns. All of these are the same yarn in different colourways, and I think the tension was pretty even on all of them as I was winding.
Complete collection of tidy, wound balls now more indicative of their yardage.
It's not nearly as helpful as actually weighing balls, but it's so nice when eyeballing one's stash for ideas to have a more accurate look at about how much is sitting there.
The first Big Thing I have gotten to knit for me! (Let’s ignore the Technicolour Dreamcardigan that languished on the needles.)
To create your own piece of fabulousness, take your favourite sock yarn in four stunning colours, add lace, add brioche, add some interesting construction and wave them around at someone who wants to buy you a present. Preheat during transit, then allow to incubate on top of your yarn stash until there’s a good amount of holiday time to really enjoy casting on. Knit happily for another four months while you completely fail to watch TV, block, fail to be capable of taking photos of such a huge thing without it looking dumb and instead start wearing immediately. Give it a shot, your results may vary.
I think mine were absolutely brilliant. I put this on every excuse I can make up and only feel slightly silly that there is no reason to wear a winter shawl in this climate, and only vaguely guilty about the lack of photos.
Bis-sock is one of my absolute favourite yarns, and now definitely not just for socks. So soft and squishy and knits perfectly, it’s perfect. I’m now the weirdo who responds to “Nice wrap” with “Ermagerd! It’s amazing you HAVE to SQUISH IT!” I’m lucky my local doesn’t carry the full range of speckles and tonals, the self-striping has already done enough damage to my wallet and stash space. I ordered the Triptyque kit from the Biscotte website, which includes three full size skeins (Chocolat, Lagon and Terre & Mer), one half skein (Gris-Gris) and the Triptyque shawl pattern.
I managed to get through an entire section before making a mistake, roughly 12 rows. This was certainly not to be the last, despite much referencing of Instagram photos. Such is to be expected when being as wonky as I am faced with an adventure such as this pattern. There was barely time to get the hang of the tricky new lace stitch before plunging back into some refreshing brioche then traversing something loopy in speckles. But the pattern is beautifully written and all manner of dumb is on me.
I’m a bit of a stickler for symmetry, so I complicated a few of the sections further by insisting on using mirrored decreases for the lacy bits. These are sadly not recorded and I have no idea how half of them happened. I must have googled how to slip-slip-purl at least 37 times and found the wrong two videos first every time. (If only there was some sort of tech that let us keep our place on the internet...) Thankfully I did make some videos when I figured out the one-pass increases and decreases, so they have officially helped at least one knitter!
This was also a great chance to test a new brioche technique I’d been thinking of, which I should really make another post about. I’ve ranted enough about one-pass brioche, but I thought it could work using the Portuguese method to work the purls. Long story short, it totally works and is totally awesome and I’ve stolen a bunch of earring hooks to make (and lose a bunch of) knitting pins.
So, please enjoy the small snippets of shawl I have managed to get photos of, and if you're up for something beautiful and absolutely fascinating to knit, I'd highly recommend giving this pattern a shot.
I don't know why I was always so intimidated by charts. Maybe it was the whole right-to-left, bottom-to-top thing that always threw me. Turns out, they're the best thing anyone every made for left-handed knitters. Yep, we get something in our favour!
Because we move stitches the other way, we get to read the chart the other way, from left-to-right, as you normally would. And with a little electronic magic, even the bottom-to-top-and-start-reading-the-wrong-line-mid-row is ameliorated. Knit Companion allows you to upload a pdf of your pattern and gives you a nice highlighter to keep track of your row, as well as stitch and row counters. The paid version lets you do even more exciting things to keep yourself organised.
The upshot of all of these marvels is this amazing shawl from Anne-Lise Maigaard & Nim Teasdale: Wild Swan.
The yarn is Fiberspates Gleem in Blue Lagoon, a 50-50 Blue-Faced Leicester and silk blend. I was looking for something natural, to block well, and with a sheen to make it a bit of a fancy thing, and this fit the bill just nicely. And for all emergency blocking needs, I can definitely recommend Yarn Glorious Yarn, lovely ladies who understand that some Saturday afternoons you find you're in desperate need of a set of blocking wires and pins yet have no idea what to do with them!
This is my first foray into such a big lace project, and I thoroughly enjoyed knitting it. I've never been as excited to block something before, and it was wonderful to see how much Mum liked it.
Just when I thought brioche couldn't get any better, it has. Introducing:
Reversible Increases and Decreases for One-Pass Brioche.
This is magic. This is groundbreaking. This actually has me excited to rip out a month's work.
This is so much harder to explain than regular increases and decreases that I made videos. I know I've been saying I would for a while. Now you have them.
I'll start with why I'm so stupidly excited (other than that I get like that pretty easy.).
With regular brioche, the increase or decrease is made with both knit and purl columns in the same stitch. While this gives a nice branching effect on the right side, on the wrong side, the columns suddenly stop and start, and the true pattern isn't shown.
Half-made Interweave hat, showing both right and wrong sides.
Regular increases and decreases start and stop abruptly on the wrong side (top).
With the reversible increases and decreases, the stitches are rearranged and each column is worked separately, to give the exact same effect on both sides. So the pattern shows true on both sides on the piece making it truly a reversible fabric. Magic!
Half-made Interweave hat showing both sides.
Reversible increases and decreases are the same on both sides of the fabric.
Then we're on to the exciting stuff. Increases. You'll need a cable needle or a crochet hook, just something to stash a stitch safely while you knit just one other.
Here's the complicated version:
Knit, do not drop the old stitch, transfer it to the cable needle and keep in front.
Move yarns as normal to prep for a purl. Purl the next stitch, again don't drop the old stitch. Draw out the new stitch and drop it to the back. Slip the original purl stitch to the left needle.
Move knit yarn to back, slip stitch off the cable needle to the left needle.
Move knit yarn to front, place loose purl stitch back on left needle. Check it's mounted correctly with the loos tail to the back of the needle, and tighten it up.
Your yarns should both be in front, a knit and a purl column have been worked and the next stitch is a knit.
And finally decreases. The process is slightly different for each, but pretty obvious when you look at which way you want it to go. It is possible to work these with ssk, k2tog etc, but I find it absurdly hard with four pieces of yarn involved. Working the stitches individually makes it less likely I'm going to drop something and easier to remember which way the decrease will lean. Bonus for righties: easier to mirror if you want to!
Again, complicated version, Decrease Left:
Knit, slip the purl stitch to the cable needle and keep at the back.
Slip the new knit stitch back to the right needle and pass the next knit stitch over.
Slip new stitch back to left needle.
Place the cabled stitch back on to the right needle. Make sure your yarns are set up for a purl stitch and purl.
Reverse the mount of the next purl stitch by slipping knit wise, then back to the right needle purl wise. Slip the new stitch back to the right needle as well, then pass the reversed stitch over.
Slip new stitch back to left needle.
Your yarns should both be in front, two knit and two purl columns have been worked and the next stitch is a knit.
Decrease Right: Slip knit stitch knit wise, slip the purl stitch to the cable needle and keep at the back. Knit next knit stitch and pass slipped stitch over.
Move yarns as normal to prep for a purl. Slip cabled stitch to the left needle, purl the next stitch then pass cabled stitch over.
Your yarns should both be in front, two knit and two purl columns have been worked and the next stitch is a knit.
I hope you enjoy these techniques as much as I do, and please get back to me with any feedback or questions.
Seems I'm making videos, I'll start at the beginning. I still haven't found a good video for my favourite cast on, so here's the Chinese Waitress Cast On, Left Handed.
I use this for everything, including brioche, I just start working with the contrast yarn then tie and weave it in later.
And here is the One-Pass Brioche. It gets such a nice swinging zen to it. While this is based on the Sockmtician's One-Pass Brioche method, I found that holding the purl yarn at the front consistently simplifies things significantly.
It's my absolute favourite thing at the moment. And it will just keep getting better... watch this space...
Yes, it turns out I do get distracted easily. Pretty colours, luscious textures, challenging new techniques and gorgeous patterns just keep popping up everywhere and taking me off on tangents.
This time it’s a combination of all of these that have me obsessed.
Interweave hat in teeny sock yarn
We have the beautiful Misti Alpaca Hand Paint Sock that my husband only wanted ankle length socks out of. I’m not one to argue when it leaves me half the skein to play with! I did love making them and he does love to wear them, so it’s certainly up there on my list of successful projects. This yarn is just gorgeous knit up normally, I was stupidly excited by the idea of trying it in brioche. It's just the most amazing combination of colour and texture.
I picked this one up on a weekend trip to Launceston, a lovely yarn store called Knits Needles and Wool.
Misti Alpaca Hand Paint Sock
On my next adventure, I picked up the contrast, also Misti Alpaca Sock in a gradient dye at the Woolshed in Canberra. It’s now my mission to visit these little shops everywhere I go, they are all so wonderful!
I’ve had the Interweave Hat in my Ravelry queue since my last affair with brioche early last year. I think there are another two or three pairs of yarn in my stash that are also slated for making this hat. It's so pretty and a very sensible pattern, once you get the hang of it. Of course sock yarn was probably not the ideal thing to try it out for the first time but I’m a deep end kinda girl. Same goes for my first attempt at one-pass brioche.
I found the Sockmatician’s One-Pass Brioche technique as I was learning early last year and immediately put in the Too Hard basket. As it turns out, it’s not much more complicated than regular brioche knitting per stitch, keeps things simpler with all the yarn at the same spot in the project, and really does get a beautiful rhythm to it.
It also turns out that the increase and decrease instructions I left for myself on my intro brioche post were terrifying, so I'll work on putting something much better together.
For now I keep my fingers crossed that I will have enough variegated yarn to get through this quite ambitious project, and in the meantime just really, really enjoy myself!
I decided I was going to try making socks. Tried a couple of worsted weight, simple short row heels. Pictures of the atrocities are featured elsewhere. But I figured it could get better, but want to try some nice sock yarn. Enter my Mum at birthday time in a yarn store. She's dangerous because she is also a textile hoarder and just loves to say: "Yes, and why not get it in blue, as well?". Now all hell has broken loose. My husband has been dragged to yarn stores to pick skeins. It's bad.
So here is everything I'm loving about socks.
Yarn
Bis-Sock by Biscotte Yarns: 85% Merino, 15% Nylon - feels like warm satin clouds spun into yarn. Also self-striping in insanely pretty colourways. This is Arielle.
Malabrigo Sock: These guys have the most striking colours. They make me just want to pick them up and gaze while I pat them for hours.
Misti Alpaca Hand Paint Sock: I could not put this skein down once I picked it up in store. So soft, so pretty. Alpaca/merino/silk/nylon, I cannot believe these are destined for my husbands feet. He had better appreciate them, though I am definitely going to enjoy the crap out of knitting them.
Needles
HiyaHiya interchangeable sock set: So tiny, so sharp! The cables are super soft and flexible and swivel so they don’t get twisty or undo the needles. A set of 5 sizes from 2-3mm with 4 circ cables.
Patterns
Eddie's Super Sock Calculator: This was the first pattern I tried with my worsted weight socks, and everything that was wrong with those socks was all down to my terrible knitting. It's the simplest, most perfect thing ever, and taught me how to short row.
Zhenya's MUMTU socks: my first attempt with sock yarn and heel flaps, and the basis for my super happy simple pattern.
Two at a time on Magic Loop: The concept that made sock knitting a possibility for me. I'm terrible at finishing projects and assume that if I tried to knit one sock at a time I would have an infinite collection of single socks. I would probably be a good patron for the local amputee association. So the idea of knitting both at once, and that they would then turn out exactly the same, was a revelation. And that I could then package them up neatly and take them anywhere was the icing on the cake. I cannot, for the life of me, remember where this amazing idea came from, however. Probably a half-asleep scrolling Pinterest lullaby that got processed and mushed up overnight. I'll get back to you.
Yarn Over Increases: Both the toes and the gussets are increased on alternate rounds. This makes the yarn-over increase the perfect way to remember where you're at. Yarn over on round one, knit the yarn-overs through the back loop on round two. When (not if) you get lost, look for the yarn overs. If they're there, knit 'em tbl, if they're not, chuck 'em in! Easy! Just make sure you do knit through the back of the stitch when you come back around, otherwise there will be holes.
Shadow Stitch Short-rows: makes picking up the stitches for the heel flap almost too easy. Like, 'I'm obviously doing this wrong and it's not going to work' easy. But it works perfectly. I'll get back to you with a left-handed version of this one, as I said, I learnt from Eddie's Super Sock Calculator.
Purling Backwards: The ultimate in smooth, zen heel knitting. By purling the short rows and heel flap backwards, you eliminate the stop-start arrhythmia of turning the work, and make the shadow stitches much simpler on the purl row.
The Super Happy Simple Pattern
Dump all of the numbers into the MUMTU pattern; pick your primary stitch count and put the right numbers in instead of letters from the chart.
Cast on about two-thirds of your total stitches (E) using Judy's Magic Cast On and knit a round.
Increase until you have E stitches. Round 1 (each needle): K1, YO, knit till 1 left, YO, K1. Round 2: knit, knitting yarn overs through the back loop.
Enjoy knitting blithely until your sock is 8.25cm shorter than you'd like it to turn out.
Start increasing on one needle using the alternating yarn over rows from the toes. This is the gusset and will be the sole side. Keep going until you have D stitches. Up to now, it's basically just the MUMTU pattern. We'll stop working in the round and turn each heel separately. This is where the magic happens, it's when things get really lazy, and we're going to totally mess up the heel extension section. The G and J stitches are still going to hang off either sides, but in-between will just be worked in Shadow Stitch Short Rows. Don't worry about all that other jazz.
Knit until there are J+1 stitches remaining, make a shadow stitch so J stitches are left hanging.
Purl backwards until there are G+1 stitches remaining, make a shadow stitch so there are G stitches left hanging.
Now the short row section is pretty obvious, keep making short rows until there are K stitches left as singles. End heel extension; begin revelation.
Now we need to pick up L stitches on each side of the short rows. If it's an odd number, knit the first two shadow stitches together. Otherwise, knit through and treat every shadow stitch as an individual stitch, the purl back the same way so you have E-2 (or M) stitches, plus the G and J stitches on the side. Now we can get back to the ordinary, lovely heel flap.
Sl1, K1 and repeat till the end, SSK the last heel flap stitch and the first hanging J stitch together.
Sl1, purl back, P2tog the last heel flap stitch and the first hanging G stitch.
Repeat 10 and 11 until there aren't any hanging stitches left. If you like, bung in an extra Sl1 at the start of every second knit row for fancy Eye of Partridge stitch.
One the heel flap is done, you've got two less stitches on the heel needle than the instep, so make an extra one to the right of the flap, using a lifted increase. It will help close the little gap. Then do the whole heel thing from 6 to the second sock.
Once the second sock has a heel and an extra little stitch, get on back to the magic loop thing and knit across both insteps.
Add that lifted increase to the left side of the heel flaps, so you're back to your original stitch count (E).
And thats it for the tricky-fun part of socks. Go ahead and knit till you run out of yarn, rip back an inch or two and re-work that last bit in rib. You can probably find a better solution to the top of a sock than that, like measuring and weighing or using an actual pattern or some such.
Bind off with something super stretchy. The interlock stitch bind off is brilliant, but again, only a right-handed resource. I have a list and some really terrible videos coming your way.